

Current Issue
10 Things to Know about Soldering Iron Tip Maintenance
High tin solders are quick to dissolve iron plating, but there are ways to extend tip life.
There have been many advances in the technology of extending soldering iron tip life. Why all this interest in getting the maximum soldering iron tip life when it wasn’t an issue before? Lead-free solder! Both Pb-free and SnPb solders will cause soldering iron tips to degrade.
Pb-free solders just happen to cause the soldering iron tips to degrade much faster.
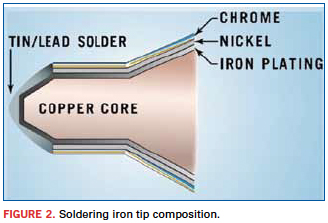
To understand the mechanisms involved with the degradation of the soldering iron tips, we first have to understand the composition of the soldering iron tips. As we look at the composition of the soldering iron tip (Figure 2), we will talk in generalities and not the specifics of any single brand. Let’s start with the core of the soldering iron tip. It is comprised of copper (Cu). This is not surprising as we know it is an excellent electrical conductor. It just so happens that most good electrical conductors are also good thermal conductors. The copper will have a layer of iron plating. The iron plating permits the solder to wet to the soldering iron tip. The non-working area of the tip is plated with nickel (as a barrier metal), and then chrome to prevent the solder from wetting all the way up the sides of the tip.
Now let’s look at what the solder is comprised of and then look at how the two interact. The typical lead-bearing solder contains a mix of tin and lead. Military applications typically call for Sn63Pb37, or solder comprised of 63% tin and 37% lead. There are many different varieties of Pb-free solders, but we’ll select a very common alloy of SAC 305. This is comprised of 3% silver (Ag), 0.5% copper, and the remainder is tin. What both alloys have in common is a fairly large percentage of tin. However, Sn63 solder only has 63% tin, while the SAC 305 solder has approximately 96% tin. Now let’s take a look at what tin does.
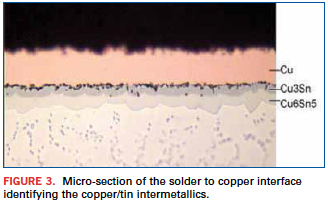
We love tin and we hate tin. We love tin because it is the metal that actually wets to the soldered surface. The reason it does this is because tin loves to melt or dissolve other metals. When molten tin comes into contact with the copper of a through-hole or surface mount land, it dissolves some of the copper at the interface of the copper and tin, and as it does, it creates molecules of copper and tin. These molecules of copper and tin that occur at the interface of the copper and solder are called intermetallics (Figure 3). This layer of intermetallics bonds the solder to the copper.
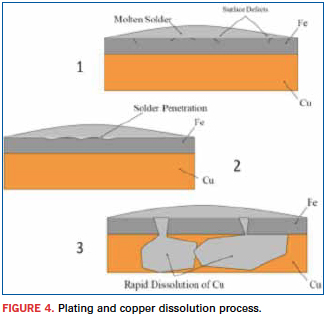
Given it looks like tin is critical to forming reliable solder connections, why do we hate it? The same intermetallics that are critical for a reliable solder connection are also the most brittle part of the solder connection. When compared to the solder or the copper, the CuSn intermetallics have a coarse grain structure. This is why most solder connection fractures occur in that layer. Fractures always travel the path of least resistance. It is the ability of tin to dissolve other metals that also reduces soldering iron tip life by dissolving the iron plating and then dissolving the copper until the tip fails. Since most Pb-free solders are 90% or more tin, they are very effective at degrading soldering iron tips. Figure 4 shows the gradual dissolution of the plating and copper of a soldering iron tip. The top image (1) is pointing out some micro-cracks in the iron plating. This is where the tin will start working away at the plating. The middle image (2) shows solder starting to penetrate the iron plating. The bottom image (3) shows that once the solder has penetrated the iron plating, it rapidly attacks the copper.
How do we stop this relentless tin scourge? We don’t. But we can take steps to mitigate the effects of tin on the soldering iron tip. Remember, solder that contains lead, such as Sn63, does not attack the plating and copper as badly as Pb-free, high tin content solders, but it does still cause the tips to degrade. I know some of you are thinking, “Why not invent tips that don’t degrade?” Well some of the greatest minds in the industry have pondered that same question. (Okay, maybe it was only me.) The problem is a wettable surface will permit solder to wet the tip (a good thing), but it also means that the tin will react and erode the tip. If a non-wettable surface is used, then the solder will just ball up and roll off the tip (a bad thing). Thicker plating will provide longer life, but the performance is changed and continues to change as the tip degrades. So let’s move on to a review of some of the ways to extend the tip life regardless of the solder alloy used.
The first step is to ensure the iron is set to the lowest temperature that will provide acceptable results. Most users will find that a 600°F (315°C) temperature will work fine for Sn63 solder that melts at 361°F (183°C). This means that the iron temperature is more than 100°C higher than the melting point. It is easy to see that even if we use a SAC 305 alloy that melts at 423°F (217°C), we still have a temperature about 100°C higher than the solder melting point. This is more than adequate. Keeping the tip at a lower temperature will reduce the effects of oxidation and dissolution of the tip plating and materials. Higher tip temperatures
will result in decreased tip life because oxides will increase and the tin will dissolve the other metals faster.
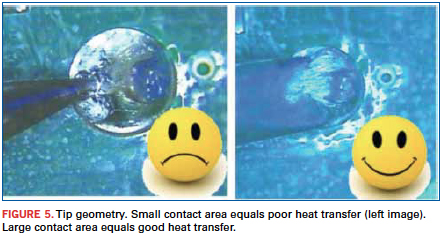
Some users insist on a higher tip temperature for hand soldering, especially with Pb-free solders. Let me float this response: If SAC 305 melts at 217°C, and the iron temperature is set to 315°C, do I need a higher temperature, or better control of the thermal dynamics in the process? If we already know that the solder should melt at 315°C, why doesn’t it? Because instead of heating the solder of the connection, we are heating the entire board, as it acts like a big heat sink and removes heat from the solder connection before the solder can melt. There are two ways to address this. One way is to improve the heat transfer from the iron into the connection. We can affect this by selecting the correct tip geometry (Figure 5). The rule-of-thumb is to select the largest tip that will fit on the land area. This will provide a larger contact area between the tip and the land, which will provide greater and quicker heat transfer. Some tips have greater thermal mass and can store a significant amount of heat so that the iron has time to respond to the heavy thermal demands.
Another way to improve heat transfer is to use a more powerful soldering station. Usually a higher wattage indicates a more powerful station. As an example, a 25W iron may not be able to keep heat flowing into the connection, while a 75W iron may be able to continuously pour heat into the connection. If the problem can’t be solved by selecting the right tip or the right wattage iron, one more method always works: preheating. The assembly is preheated in any of a number of ways, and when the board temperature near the connection area is approximately 125°C, it should solder like any other connection. What’s that? Your board has the thermal mass of a boat anchor? No problem. Get that preheat temperature up to about 150°C. This temperature is still well below the solder melt temperature, but now the iron’s heat won’t be dissipated trying to heat the entire board, and instead it can melt the solder and form the connection. If you’re still having a problem try a preheat temperature of 175°C. If problems persist after preheating the assembly to 175°C, it’s time for a long talk with the person who designed the assembly.
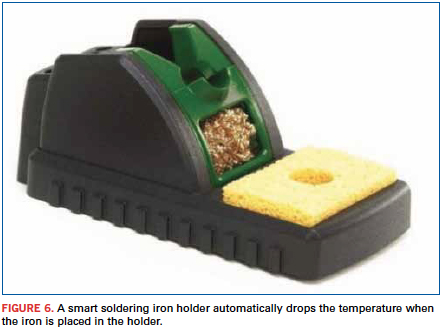
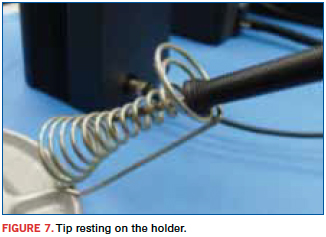
Soldering iron stands have come a long way over the past decade. Soldering personnel are asked to turn their irons off when they go on break, but this happens only occasionally. Worse is forgetting to turn it off at the end of the shift. Now we have intelligent iron holders (Figure 6). These holders may work differently, but most of them will drop the temperature when the iron is placed in the stand and turn the iron off after a predetermined time of inactivity. The best advice is to use the soldering iron stands designed for that soldering iron. Some soldering irons can sense thermal demand, and if the tip is not left unsupported (Figure 7), will continuously try to heat the holder, resulting in greatly decreased life.
What can the soldering technician do to increase tip life? First, make sure the soldering iron tip is tinned prior to replacing it in the holder. Will the tin in the solder react with the tip plating? Yes, but this is better than letting the soldering iron tip become highly oxidized and unusable. If the tip is coated with solder, the solder will become oxidized.
Most users are aware that a shiny soldering iron tip solders better than a dull, dirty, oxidized tip. If the iron has been in the holder for awhile, wipe off the old oxidized solder that was on the tip. Do you use the brass wiping pad, or the moist sponge (Figure 8) for wiping the tip? The brass wiping pad is actually softer than it looks. It is very lightly abrasive and does not contaminate the tip. It is pretty effective at keeping a tip clean. A sponge that is moist or damp is very effective at cleaning the soldering iron tip. The reason that the sponge is so effective is that when the hot soldering iron tip contacts the moist surface of the sponge, there is a rapid temperature drop on the tip. As we all learned in school, metals contract as temperature decreases and expand as temperature increases. This rapid temperature change, along with the rapid contraction and expansion of the tip, helps to dislodge really stubborn particles that couldn’t be removed with just the brass pad. Unfortunately, this means that the plated surface of the soldering iron tip starts to develop micro-cracks from the expansion and contraction. These micro-cracks permit the molten tin to get a foothold and start the erosion process of the tip. The best method is to use the brass wiping pad all the time and only use the moist sponge when there are really stubborn oxides or flux residues the pads aren’t removing. This process will result in increased tip life.

On occasion, sponges or brass pads must be cleaned or replaced so that they don’t become a source of contamination. Some users use deionized (DI) water so as not to contaminate the solder connection. Obviously, even tap water doesn’t have visible particles floating in it. If there are particles in the water, then they are very small. What could these particles be? Halides (organic salts) such as chlorides (disinfectant) and fluorides (tooth decay prevention). The water may also contain other organic material and metal particles. Of course these tiny metal particles have been converted to oxides by the high temperature and oxygen. So, could all these contaminate the solder connection? Use a solder pot to perform an experiment. Take any of these materials and try to contaminate the solder pot. What happens? They all float on the surface, which means that they will not become an integral part of the connection. Even though contaminants from tap water may not have an effect on the solder connection, they may end up burned onto the tip, which will reduce the tip performance. Is DI water better? Yes, but not critical.
By the way, for those who think it is better to whack the iron against something to knock the old solder off, quit it! In the “old days” most soldering irons had a heating element and a tip. Many modern soldering irons have electronics in the tip and the handpiece that can be damaged by banging the tip against a hard object. Also, many users report that flying molten solder (from banging the soldering iron tip) hurts when it lands on unprotected skin. I’ll let you be the judge of that.
A solder pot can be used for very stubborn scale and residues on the surface of the tip. The iron tip can be immersed for 10-15 sec. in the hot solder to re-tin the tip. Keep in mind that only the working end of the tip should be immersed. The molten solder in the solder pot can remove quite a bit of the plated surfaces.
At some point there will be a time when the tip will develop some residues that can’t be removed by the brass wiping pad or moist sponge. Then we have to look at more aggressive methods of tip recovery. Tip scrubbers will do an excellent job of removing the contaminants, but unfortunately they also remove some of the plating. There are also tip tinners. These tip tinners are comprised of small solder particles, similar to solder paste, and other “magic” ingredients. Some of these “magic” ingredients are corrosive, which is why they are so effective, but this also means they need to be used in a manner that will prevent the tip tinner corrosive materials from remaining on the tip (Figure 9) or creating cross-contamination of the product being soldered.

So what did we learn about prolonging our soldering iron tip life?
- Tin is our friend and enemy.
- Keep the iron temperature as low as possible.
- Select the correct tip geometry for the solder connection.
- Use auto-setback and shut down stands.
- Keep the soldering iron tip tinned.
- Use the brass wiping pad for regular cleaning of the tip.
- Use the moist sponge for stubborn scale.
- Don’t “knock” solder off of the tip.
- Use a solder pot to rejuvenate the tip when a sponge can’t.
- Use tip scrubbers and tip tinners as a last resort.
Good luck and happy savings.
Acknowledgments
Special thanks to Paul Wood and Ed Zamborsky of OK International for sharing their data and images.
Ray Cirimele, MIT, is a master instructor at STI Electronics, Inc.; rcirimele@stielectronicsinc.com.


