Stencil Frames and Artwork: No One Size – or Location – Fits All

Do the costs “justify” the image location?
Over the years, this column has touched on many facets of stencil production, including stencil metals, aperture shape considerations, nanocoatings, frame tensioning mechanisms and more. Certainly, these are important discussion points, as the stencil, its thickness and manufacturing accuracy are critical components to a high-yield printing operation. What we haven’t addressed, however, is why a particular stencil frame size or artwork location is selected. Honestly, I wouldn’t be surprised if many readers have even considered stencil size as a way to potentially realize some cost savings. Perhaps you should.
In the early days of surface mount technology, the 29" x 29" stencil frame was almost the only option available, primarily due to necessity. With the exception of some screen printers that used custom, rectangular-shaped stencils, the majority of mainstream automatic printers could only accept 29" x 29" frames because the chase was not adjustable. Manual and semiautomatic benchtop machines generally used 23" x 23" stencils. So, stencil frame size was more or less predetermined. As print platforms improved, adjustable mounts and chase adaptors were introduced, allowing manufacturers to choose what stencil frame size to use on a fully automatic machine. Today, the vast majority of assemblers (probably close to 95%, in my opinion) use either a 29" x 29" frame or a 23" x 23" frame. There are still the occasional rectangular-shaped stencils, but those are the exception, not the rule.
Sometimes the stencil frame size choice is an easy one. A large board, such as a server, backplane or industrial control board can only be accommodated on a 29" square stencil. Smaller products, such as mobile phone or consumer electronics boards, present manufacturers with a choice: Stick with a 29" x 29" frame, or move to a 23" x 23" frame and, perhaps, save storage space and give operators an easier time with the task of manually handling the stencil during setup. Of course, if these topics are ultra-important, then not only a change in stencil size could be in the cards, but a move toward a frameless system might also be worth considering. So, while assemblers often default to a 29" frame out of habit, it may be worth contemplating a change for the next stencil procurement.
After selecting the stencil size, a decision on image location – whether center- or edge-justified – has to be made. Historically, front-justified images were used for automatic machines due to the manual stencil loading requirement. The operator would load the stencil into the machine, push it back to a preset stop, and the front rail of the machine became the positioning reference point. With today’s advanced machines, the stencil can be automatically loaded and situated with actuators that enable center-justified artwork stencils to be accurately positioned in the print nest. The center-justified stencil grew in popularity in sync with finer-pitch printing with the advent of the 0.4mm QFP in the mid-1990s. The even distribution of tension toward the center of the stencil permits more symmetrical paste release from the apertures, which is why virtually all products that require fine-pitch, high-density printing are produced with center-justified artwork stencils. For modern technology, a center-justified stencil is really the only choice (FIGURE 1).

Figure 1. Center justified.
That’s not to say front-justified artwork doesn’t still have its place. For standard SMT or NPI, front-justified stencils may permit two to four images on a single panel, depending on board size, and can be another way to save costs (FIGURE 2 and 3). In the case of NPI and development work, a great way to save cost is to have different designs cut within one stencil so that a simple 90° or 180° rotation permits front justification of the various artworks. Instead of having four stencils manufactured and shipped, you only pay for production of a single stencil.
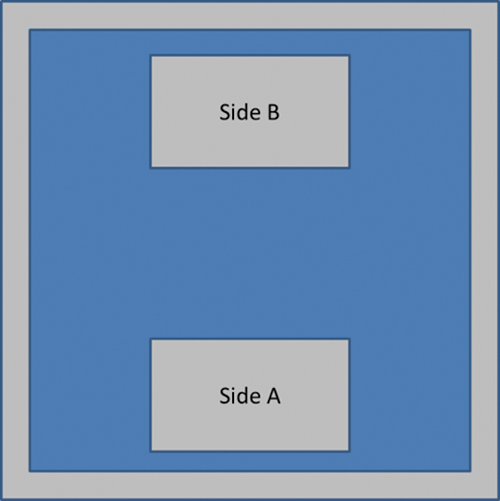
Figure 2. Front justified, two images.
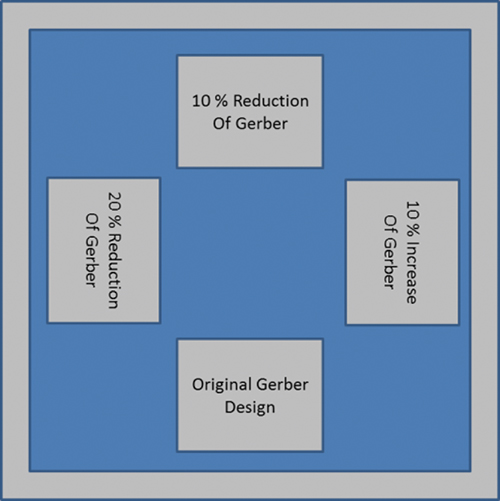
Figure 3. Front justified, four images (NPI).
If the board artwork is only 150 x 100mm and is being produced on a 29" x 29" frame stencil, consider moving to a 23" square for easier handling and storage. And, new product development might warrant multiple images on a single stencil. Though it may seem a minor point, these small changes can add black ink to the bottom line.
is global applied process engineering manager at ASM Assembly Systems, Printing Solutions Division (asmpt.com);
clive.ashmore@asmpt.com. His column appears bimonthly.


